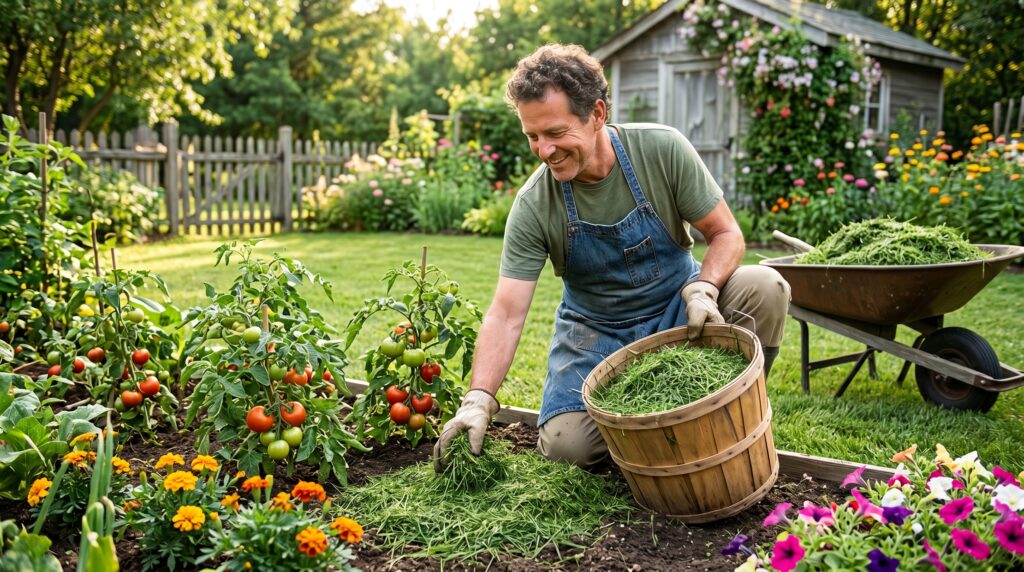
Every time you mow your lawn, you’re creating a free and powerful resource — but most people throw it away. Grass clippings are packed with nutrients that can improve your soil, boost plant growth, and reduce the need for chemical fertilizers.
With a few simple techniques, you can turn this “waste” into one of the most effective natural fertilizers for your garden.
Imagine cutting your fertilizer bill in half (or more) while giving your tomatoes, flowers, and lawn exactly what they need — straight from your own backyard. Grass clippings are loaded with nitrogen (about 4%), phosphorus, potassium, and trace minerals. As they break down, they feed beneficial soil microbes, improve soil structure, and help retain moisture.
Ready to stop bagging and start benefiting? Here’s your complete, no-nonsense guide.
Why Grass Clippings Make Excellent Natural Fertilizer
- High in nitrogen — Perfect for leafy green growth in vegetables, lawns, and ornamentals.
- Slow-release nutrients — They feed plants gradually instead of shocking them like synthetic fertilizers.
- Improves soil health — Adds organic matter and stimulates microbial activity.
- Free & eco-friendly — Reduces landfill waste and cuts your carbon footprint.
- Versatile — Use them on your lawn, as mulch, in compost, or as liquid fertilizer.
Pro tip: One average lawn can produce enough clippings each season to replace 25% or more of your annual fertilizer needs.
Important Safety Precautions (Read This First!)
Before you do anything, follow these rules:
- Only use clippings from untreated lawns. Never use grass that has been sprayed with herbicides (especially broadleaf weed killers like 2,4-D), pesticides, or fungicides. These chemicals can kill your garden plants or contaminate vegetables.
- Skip clippings if your lawn has a fungal disease.
- Fresh clippings can mat and smell bad if piled too thick. Always use them in thin layers or dry them first.
- For vegetable gardens: Stick to untreated grass only.
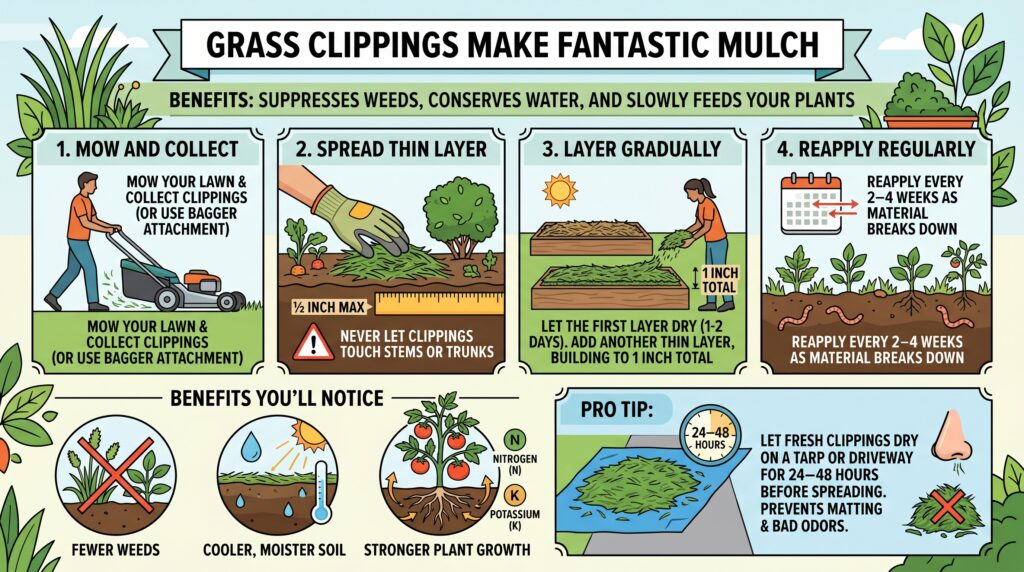
Method 1: Grass Clippings as Garden Mulch (Step-by-Step)
Grass clippings make fantastic mulch that suppresses weeds, conserves water, and slowly feeds your plants.
Step-by-step instructions:
- Mow your lawn and collect the clippings (or use a bagger attachment).
- Spread the clippings in a thin layer (½ inch max at first) around plants, vegetables, and shrubs. Never let them touch stems or trunks.
- Let the first layer dry for a day or two, then add another thin layer. Build up gradually to about 1 inch total.
- Reapply every 2–4 weeks as the material breaks down.
Benefits you’ll notice:
- Fewer weeds
- Cooler, moister soil
- Stronger plant growth from the slow-release nitrogen and potassium
Pro tip: For best results, let fresh clippings dry on a tarp or driveway for 24–48 hours before spreading. This prevents matting and bad odors.
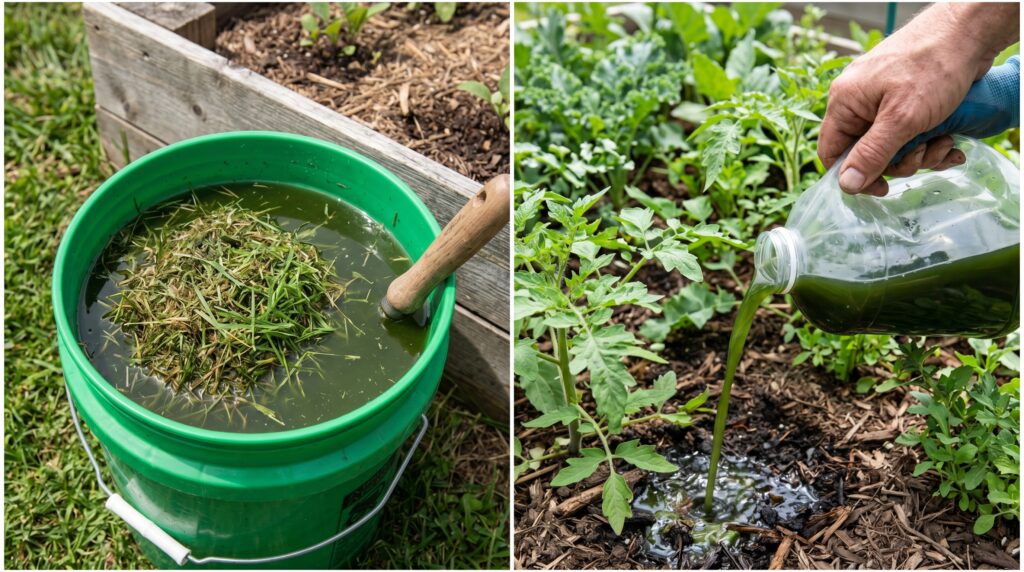
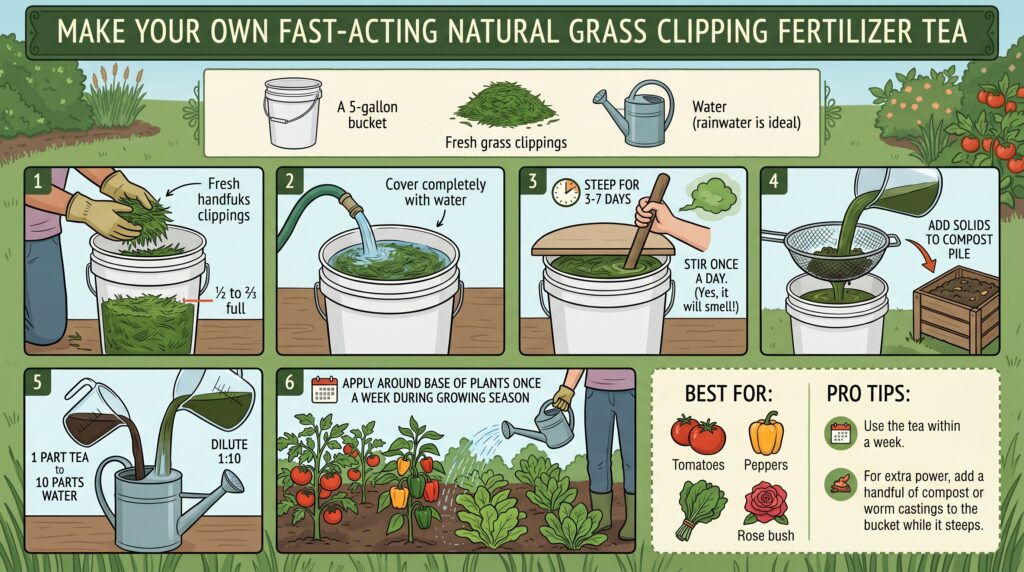
Method 2: Make Grass Clipping Tea – Liquid Gold Fertilizer
This is one of the fastest-acting natural fertilizers you can make at home.
What you need:
- Fresh grass clippings
- A 5-gallon bucket
- Water (rainwater is ideal)
Step-by-step instructions:
- Fill the bucket about ½ to ⅔ full with fresh clippings.
- Cover completely with water.
- Place a lid or board on top and let it steep for 3–7 days. Stir once a day. (Yes, it will smell — that’s normal!)
- Strain out the solids (add them to your compost pile).
- Dilute the tea 1:10 with water (1 part tea to 10 parts water).
- Apply around the base of plants once a week during the growing season.
Best for: Tomatoes, peppers, leafy greens, roses, and any plant that loves nitrogen.
Pro tip: Use the tea within a week. For extra power, add a handful of compost or worm castings to the bucket while it steeps.
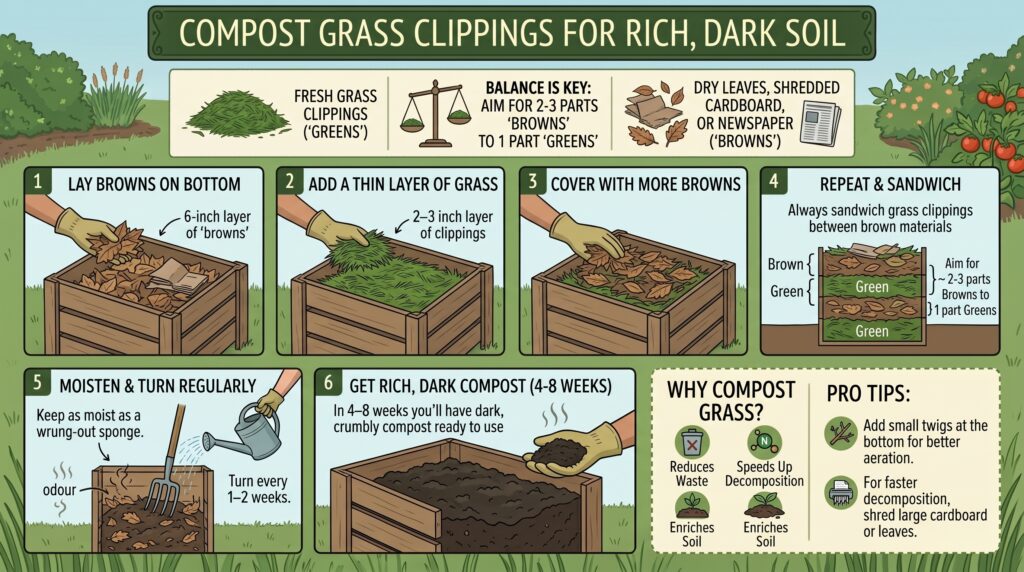
Method 3: Compost Grass Clippings for Rich, Dark Soil
Grass clippings are “green” material (high nitrogen). They speed up composting but need balance.
Step-by-step composting guide:
- Start with a 6-inch layer of “browns” (dry leaves, shredded cardboard, or newspaper) at the bottom of your compost bin or pile.
- Add a 2–3 inch layer of grass clippings.
- Cover with another layer of browns.
- Repeat, always sandwiching grass between brown materials (aim for roughly 2–3 parts brown to 1 part green).
- Keep the pile as moist as a wrung-out sponge and turn it every 1–2 weeks.
- In 4–8 weeks you’ll have dark, crumbly compost ready to use.
Pro tip: Grass clippings are excellent “activators” — toss a few handfuls into a sluggish compost pile to kickstart decomposition.
Pro Tips for Maximum Success
- Mow when grass is dry for cleaner, easier-to-handle clippings.
- Chop clippings finely (mulching mower or second pass) for faster breakdown.
- Store extra dry clippings in paper bags or bins for winter use.
- Combine methods: Use some for tea, some for mulch, and the rest in compost.
- In hot summer weather, apply mulch or tea in the early morning or evening.
- Test your soil every couple of years — grass clippings plus compost often reduce or eliminate the need for extra amendments.
Common Mistakes to Avoid
- Applying thick, wet layers (causes slime and bad smells)
- Using chemically treated clippings on edibles
- Letting fresh clippings touch plant stems
- Ignoring the brown-to-green ratio in compost
- Forgetting to dilute grass tea (it can burn plants if used full strength)
Start Today and Transform Your Garden
You don’t need fancy products or expensive equipment — just your lawn mower and a little know-how. Whether you choose to grasscycle your lawn, mulch your vegetable beds, brew grass tea, or build a compost pile, you’re turning “waste” into wealth for your garden.
Pick one method this weekend and try it. Most gardeners who start using grass clippings this way never go back to buying fertilizer again.